Research on native species, technical development and standard promotion

The Engineers’ Association prioritises research on native species, leading to breakthroughs in early emergence techniques for bamboo shoots, organic fertiliser production, and mixed planting of hickory and native herbs. These advancements not only address farmers’ technical challenges but also enhance biodiversity and ecosystem resilience. The Association has also contributed to the formulation of forest resource management standards for Lin’an District, ensuring scientific guidance for agroforestry development is rooted in local ecological conditions. 

  • The Association integrates experts from various fields to research native species and develop agroforestry techniques that balance conservation and economic growth
  • Collaboration with local government, research institutions, and experienced farmers facilitates the development and implementation of scientific standards for local forestry products such as the bamboo shoots, hickory nuts, and other flagship products
  • Cross-sectoral collaboration is essential for advancing agroforestry technologies and promoting standardised, research-based approaches to native species conservation and sustainable use
Community participation in collaborative development

A network of community partnerships fostered to promote collective growth, with a focus on encouraging female entrepreneurship.

  • Lin’an has developed a robust network of partnerships, offering one-stop services for organic farming and e-commerce marketing, promoting a culture of collaboration that benefits the entire community.
  • Female participation in bamboo shoot and hickory nut processing has deep roots in Lin’an. The rise of e-commerce has empowered many women to establish their own brands, leveraging their skills and personal competencies. Supported by government initiatives that encourage female entrepreneurship, a growing number of women are emerging as business leaders in Lin’an, setting an example for others in their communities.
  • Create effective community cooperation mechanisms to encourage participation in sustainable farming and collaborative production and marketing models.
  • Use community and e-commerce platforms to facilitate information exchange, improving market transparency and efficiency.
Ecological farming and regional cultural excavation

Promote organic and ecological cultivation, linking eco-tourism and other industries to enhance the cultural value of local agricultural products.

  • Collaboration with research institutions to offer training and guidance on ecological planting techniques.
  • Leverage the “celebrity economy” to create flagship products, combining local products like bamboo shoots, hickory nuts, and tea with eco-tourism to add cultural value.
  • Regular training enhances farmers’ awareness and skills for sustainable planting.
  • Offer subsidies and rewards to encourage ecological planting practices and reduce chemical inputs.
E-commerce branding

The regional public branding helps promote Lin'an's unique agricultural products via e-commerce platforms, build branded products, and enhance product value by setting group standards.

  • The Lin'an Bureau of Agriculture and Rural Affairs launched the "Tian Mu Shan Bao (Teasures of the Tianmu Mountains)", the regional public brand, strictly reviewing local sustainable sub-brands, ensuring quality and market recognition.
  • The government supports e-commerce development, builds infrastructure like fresh bamboo shoot markets and logistics bases, and provides training and financial aid.
  • Use e-commerce data tools to target markets and create a brand that meets consumer demand.
  • Establish strict quality standards and traceability systems to build consumer trust.
Comprehensive Factory Layout and Workflow of Menstrual Pad Production Unit

Factory Layout Overview:

The sanitary pad production unit is located near an urban area to ensure easier access to distribution channels, skilled labor, and transport networks. The factory is built with concrete walls and insulated galvanized tin sheet roofing, providing durability and heat protection during warmer seasons.

  • Total Area: 1,420 sq. ft
  • Production Scale: Semi-scale
  • Daily Output: 3,000 pads
  • Key Areas: Raw material storage, production floor, office, break room, restroom, and an internal lab for testing pads

For visuals of the layout and machine placement, please refer to the gallery attached to this block.

Step-by-Step Production Workflow

  1. Raw Material Collection
  2. Banana Fiber Paper Shredding
  3. Fluffy Absorbent Core Formation
  4. Layer Assembly and UV Sterilization
  5. Packaging and Storage

Note: Hygiene is a top priority. The factory adheres strictly to national hygiene standards and follows clear internal protocols to ensure product safety at every stage of production. For further insights on hygiene practices, see Solution name “Defining a Good Menstrual Pad: A User-Centered R&D Process in Nepal.”

Additional Documents Available in this Block:

  • Detailed factory layout and production/material flow (PDF)
  • Energy consumption overview (PDF)
  • Cost estimation for setting up the factory (PDF)
  1. Access to Skilled and Committed Local Teams: A key enabler was working with a motivated local team of engineers, technicians, and community members who co-developed the layout, machinery, and production processes.
  2. Collaborative Engineering Partnerships: Close collaboration between Sparśa, NIDISI, and Grit Engineering ensured a practical and efficient setup tailored to compostable pad production using banana fiber.
  3. Availability of Local Building Materials: Using locally available materials for construction helped reduce costs, avoid delays, and ensure context-appropriate building design.
  4. Proximity to Urban Infrastructure: Choosing a location close to electricity supply lines, road access, and labor pools helped streamline setup and operational logistics.
  5. Commitment to Hygiene and Quality Standards: The integration of hygiene protocols and on-site testing facilities ensured product safety and regulatory compliance from the beginning.
  6. Hands-On Prototyping and Iteration: The flexibility to prototype machine layouts and factory flow on-site allowed for rapid problem-solving and process improvements.
  1. Start with a Leased Facility
    When budgets are limited, leasing a space is a more flexible and cost-effective option. Once the product gains traction and operations stabilize, you can invest in building a permanent facility.
  2. Select Your Location Wisely: Choose land with access to government utilities like water and electricity. Avoid polluted areas or sites near chemical factories to meet hygiene standards. Engaging with local community members early can help prevent land-use conflicts later.
  3. Involve Professionals from the Start: Even for small buildings, consulting architects or engineers is essential. Key aspects like ventilation, lighting, and structural durability are often overlooked without expert input.
  4. Maintain Clear Communication with Contractors: Regular updates and site visits help ensure that the work follows your expectations and timeline, reducing delays and misunderstandings.
  5. Plan the Electrical Setup Around Machines: Understand your machines’ power needs (single-phase vs. three-phase) before finalizing layout. Proper planning avoids costly rewiring or power mismatches during installation.
  6. Build Local Technical Support Networks: Having a reliable local metalworker or technician on standby can make a big difference when small repairs or adjustments are needed—keeping your production on track.
Fluffy Absorbent Core Making: Machinery Overview, Detail process explanation, 3D Models

This block explains how processed banana fiber sheets are transformed into fluffy, absorbent cores using a custom-built semi-automatic machine. These absorbent cores form the middle layer of compostable menstrual pads.

The machine operates through a carefully sequenced, semi-automated process designed to ensure consistent quality and efficiency, especially in low-resource settings:

  1. Shredding:  The process begins with a shredder that cuts banana fiber sheets into small, uniform pieces using rotating blades. This ensures consistency for the next stages.
  2. Feeding and Agitation: Shredded paper is fed into a hopper fitted with an Archimedes screw and an agitator. The screw provides a steady feed into the pulverizer, while the agitator prevents clogging.
  3. Pulverizing and Fluff Core Formation: Inside the high-speed pulverizer, the paper is broken down into fine fluff. Centrifugal air motion spreads the fluff evenly onto a confined moving belt.
  4. Compression into Sheets: The evenly distributed fluff is compressed between two belts using a series of rollers. This binds the fluff into continuous absorbent sheets.
  5. Cutting to Size: The sheets are then moved by a conveyor to a cutting unit powered by an air compressor and controlled by a universal timer. This unit cuts the sheet into the required absorbent core dimensions.
  6. Trimming and Fluff Recycling: Dies press the sheet into shape, while surrounding air nozzles blow away excess fluff. This loose material is collected via suction and recycled for reuse.

This process enables clean, efficient, and uniform absorbent core production, using locally available materials and technology appropriate for semi-scale operations.

Additional Resources for Replication:

  1. Strong Collaboration with Local Engineering Workshops
    Building a custom machine required close cooperation with skilled metalworkers and engineers who could adapt designs, prototype components, and iterate based on field feedback.
  2. Clear Technical Specifications and Planning
    Developing a detailed understanding of each process step—shredding, feeding, pulverizing, sheet formation, and cutting—was essential for translating needs into machine design.
  3. Availability of Banana Fiber Paper
    A consistent and quality supply of processed banana fiber sheets was necessary to ensure the performance of the machine and the fluff core output.
  4. Reliable Power Supply and Air Compression System
    The machine requires stable electricity (including high-speed motors) and a safe, well-regulated compressed air system for the cutting unit and fluff recycling.
  5. Prototyping Mindset and Flexibility
    The development process included trial-and-error phases, requiring patience, a flexible approach to adjustments, and ongoing testing to achieve the desired fluff consistency and hygiene standards.
  1. Set Clear Agreements with Machine Builders: A well-defined contract is essential. It should cover machine capabilities, materials to be used, budget constraints, delivery timelines, mechanisms for addressing delays, and any expected custom modifications.
  2. Maintain Frequent Communication and Site Visits: Regular check-ins with the fabrication team—both virtual and in-person—help ensure the machine is built as per design, and enable fast troubleshooting when issues arise.
  3. Expect Delays and Use Time Strategically: Machine fabrication often takes longer than anticipated. During such delays, focus on parallel tasks like training, raw material procurement, or factory setup to avoid bottlenecks later.

Technical Lessons from Using the Custom Machine

  1. Air-Compressed Cutting System: A Safety Concern: The air-compressed cutting mechanism proved complex and posed safety risks due to potential pipe disconnections under high pressure. A roller-based cutting system would be simpler and safer for future designs.
  2. Dust Management is Critical: Banana fiber, when pulverized, creates fine airborne particles. Combined with high-pressure air, this generates a lot of dust. Effective ventilation and dust control systems are essential for safe, hygienic operation.
  3. Custom Machine Development Requires Patience: While tailored machines offer precision and innovation, the design process demands strong technical understanding, problem-solving, and patience through trial-and-error development cycles.
Operational Insights: Production, Materials Handling, and Maintenance

X

Water Management Systems: Overview, Design, and Functionality

Water Use and Treatment in the Paper Factory

A paper factory consumes a large quantity of water. The production process—cooking, refining, and forming the paper sheets—requires the pulp to be diluted, concentrated, and diluted again multiple times. In our case, this leads to a daily water usage of up to 2,000 liters for a production of 20 kg of paper per day.

Because we use this paper as the absorbent core of menstrual pads, maintaining high hygiene standards is essential. Good hygiene practices by operators alone are not sufficient if the water used in production is contaminated with bacteria or other pathogens. Therefore, we needed to build a reliable water treatment system that would ensure the cleanliness of the water used, while also meeting our constraints: low-cost, low-tech, and easy to replicate.

Instead of designing a system from scratch, we adapted an existing model developed by Aqueous Solutions. Their open-source system uses layers of stone, gravel, sand, and biochar to treat water, and they provide free documentation for two different installation sizes.


Our Adapted Water Treatment System


Below is a breakdown of the components in our installation:

1. Groundwater Storage Tank (1000L)

  • Groundwater is pumped into this tank and flows by gravity into the next stage.
  • The pump is controlled by a float switch that turns it on automatically when water levels fall below a certain point.

2. Gravel Filter (750L)

  • Water enters from the bottom of the tank and flows through three layers: large stones, coarse gravel, and pea gravel.
  • These layers help remove solid particles from the water, as they settle in the bottom of the tank. 
  • Every 2–3 months, a 2-inch pipe at the bottom is opened to flush out accumulated sediment.
  • A floating valve at the inlet prevents overflow.

3. Slow Sand Filter (750L)

  • Water flows into this tank from the top and passes downward through fine sand.
  • Physical filtration removes fine particles, while a biofilm that forms in the top 1–2 cm of sand biologically treats pathogens and organic matter.
  • Over time, the biofilm can reduce flow. To maintain efficiency, the surface of the sand is stirred every 3 months, and the tank is flushed from the top to remove suspended particles.

4. Biochar Filter (750L)

  • Water flows from the top through a bed of biochar.
  • The micropores in the biochar absorb dissolved chemical contaminants, while a thin biofilm further degrades some pollutants.
  • This combination of adsorption and biodegradation effectively purifies the water.

5. Freshwater Storage Tanks (500L and 2000L)

  • After treatment, clean water is first stored in a 500L tank at ground level.
  • It is then pumped into a 2000L elevated tank (about 3 meters high).
  • From there, water is distributed by gravity to the production process and toilets.


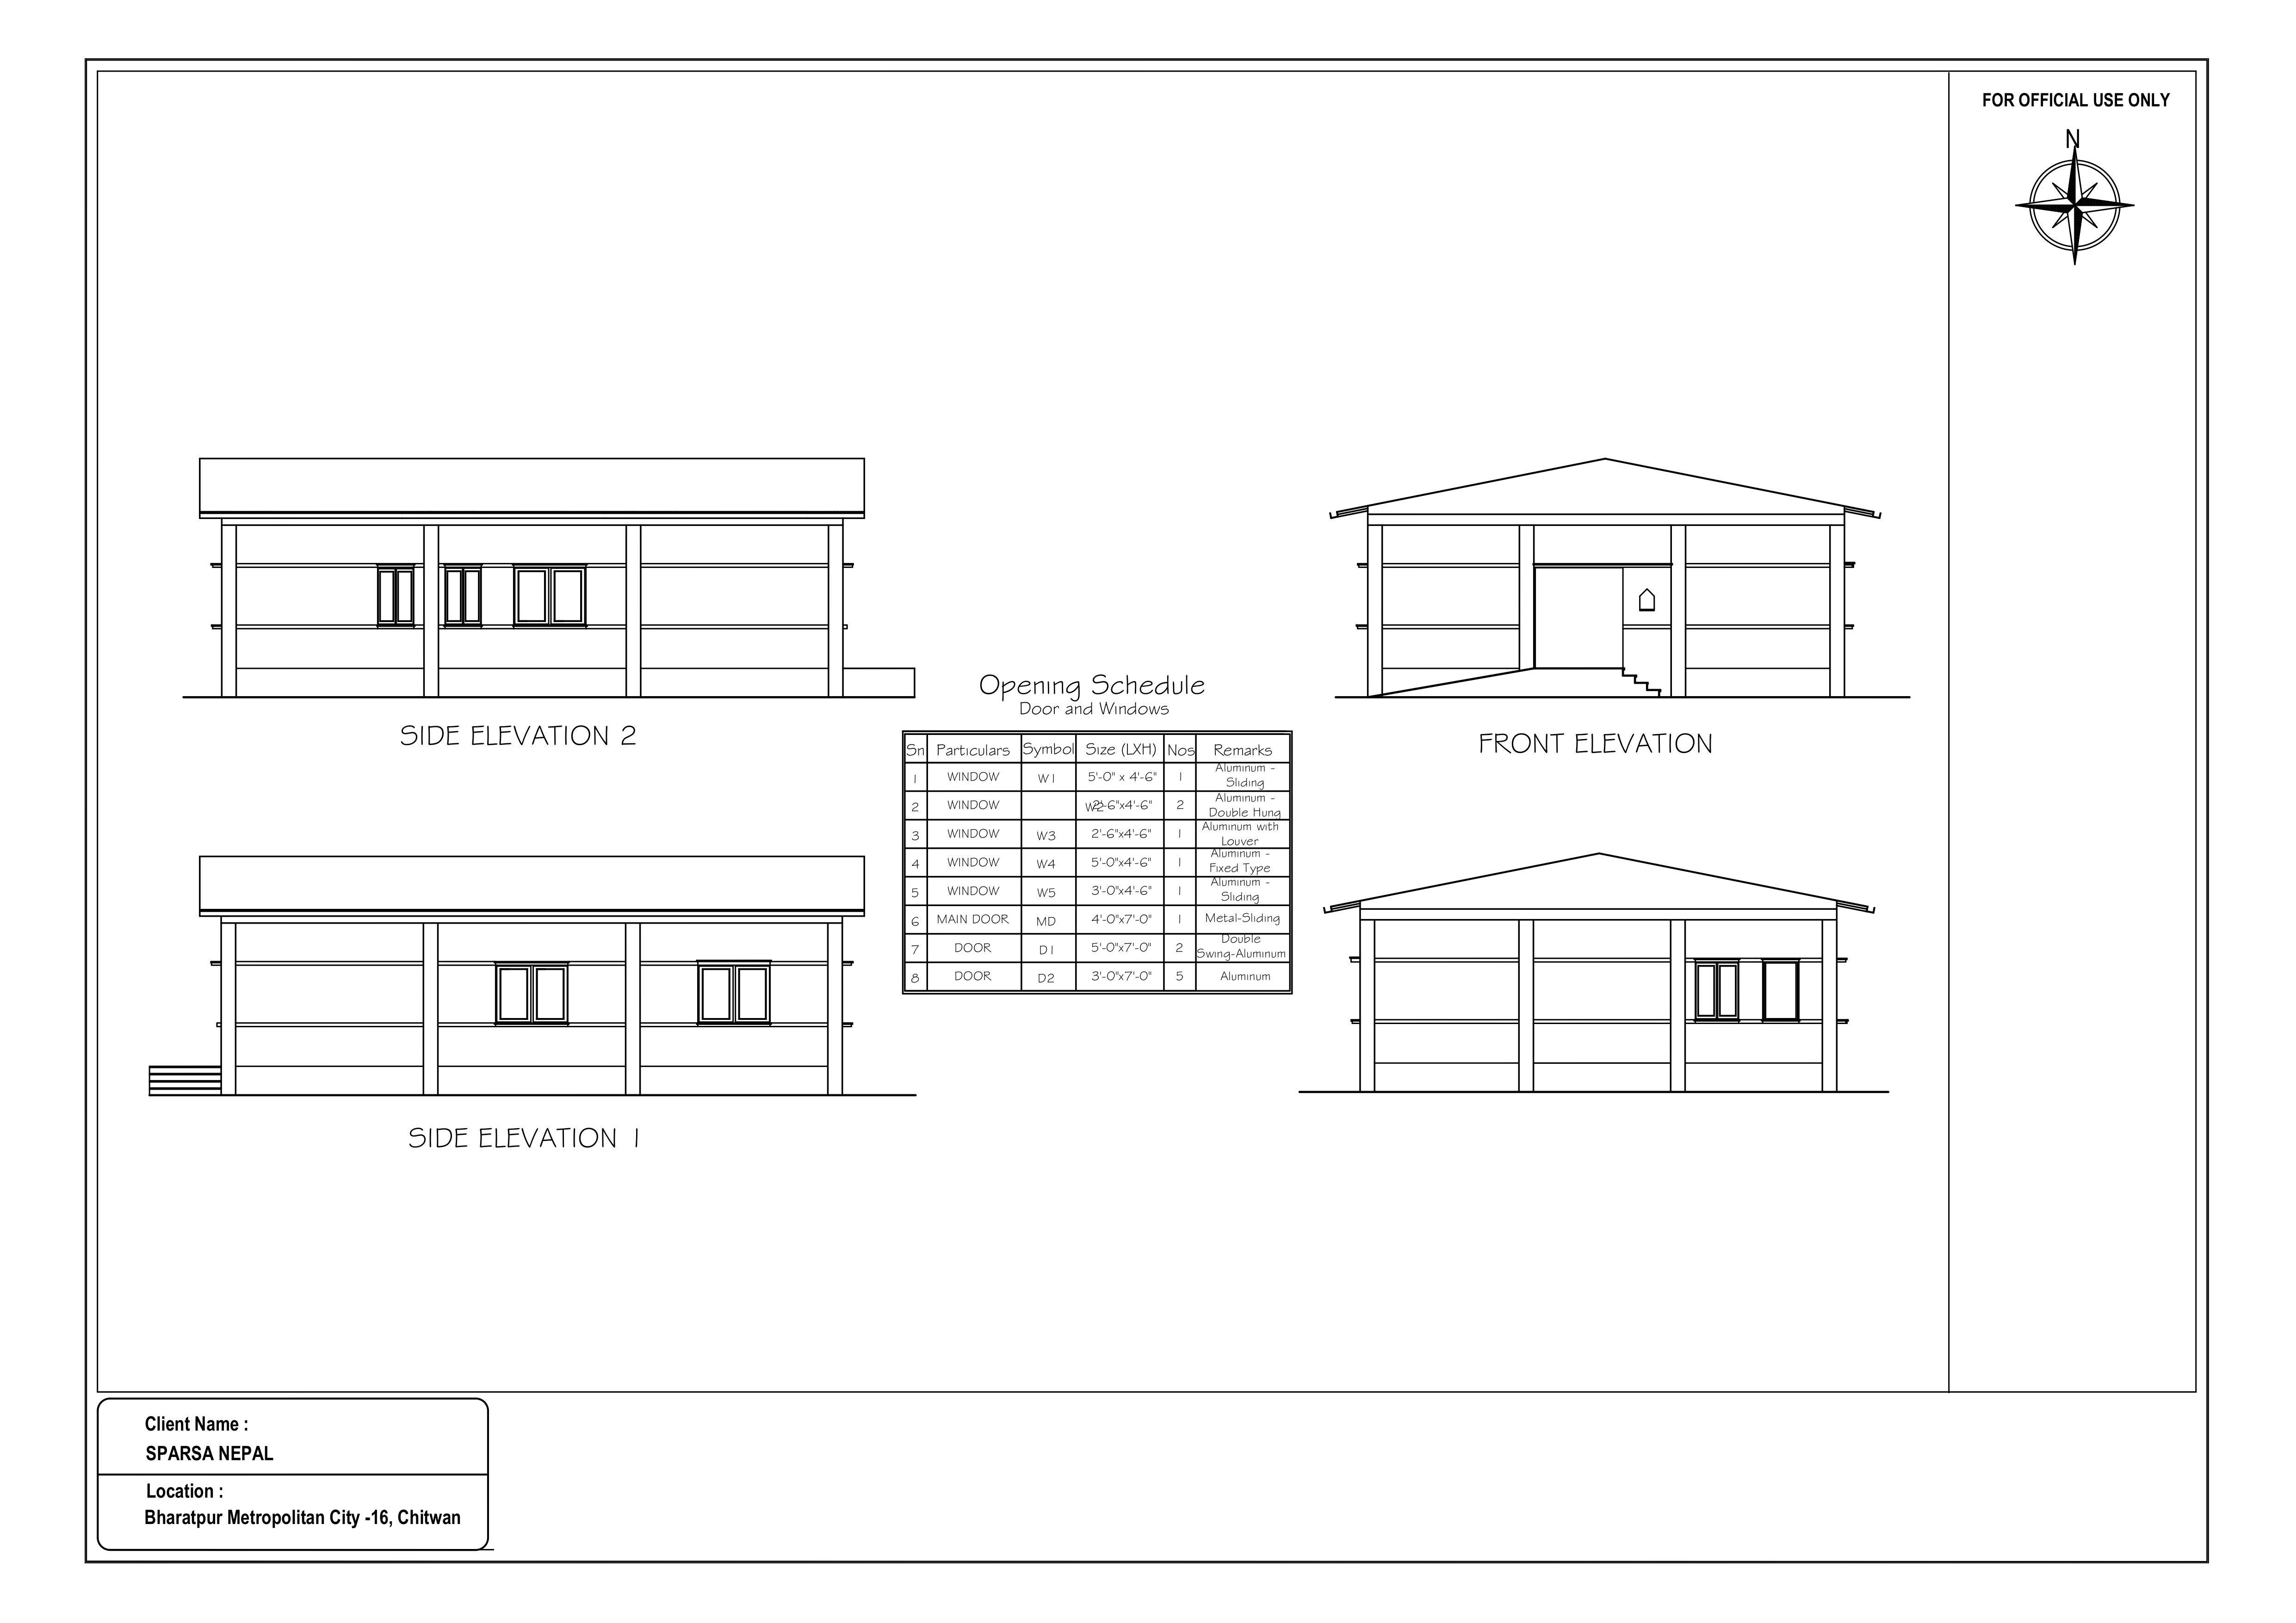
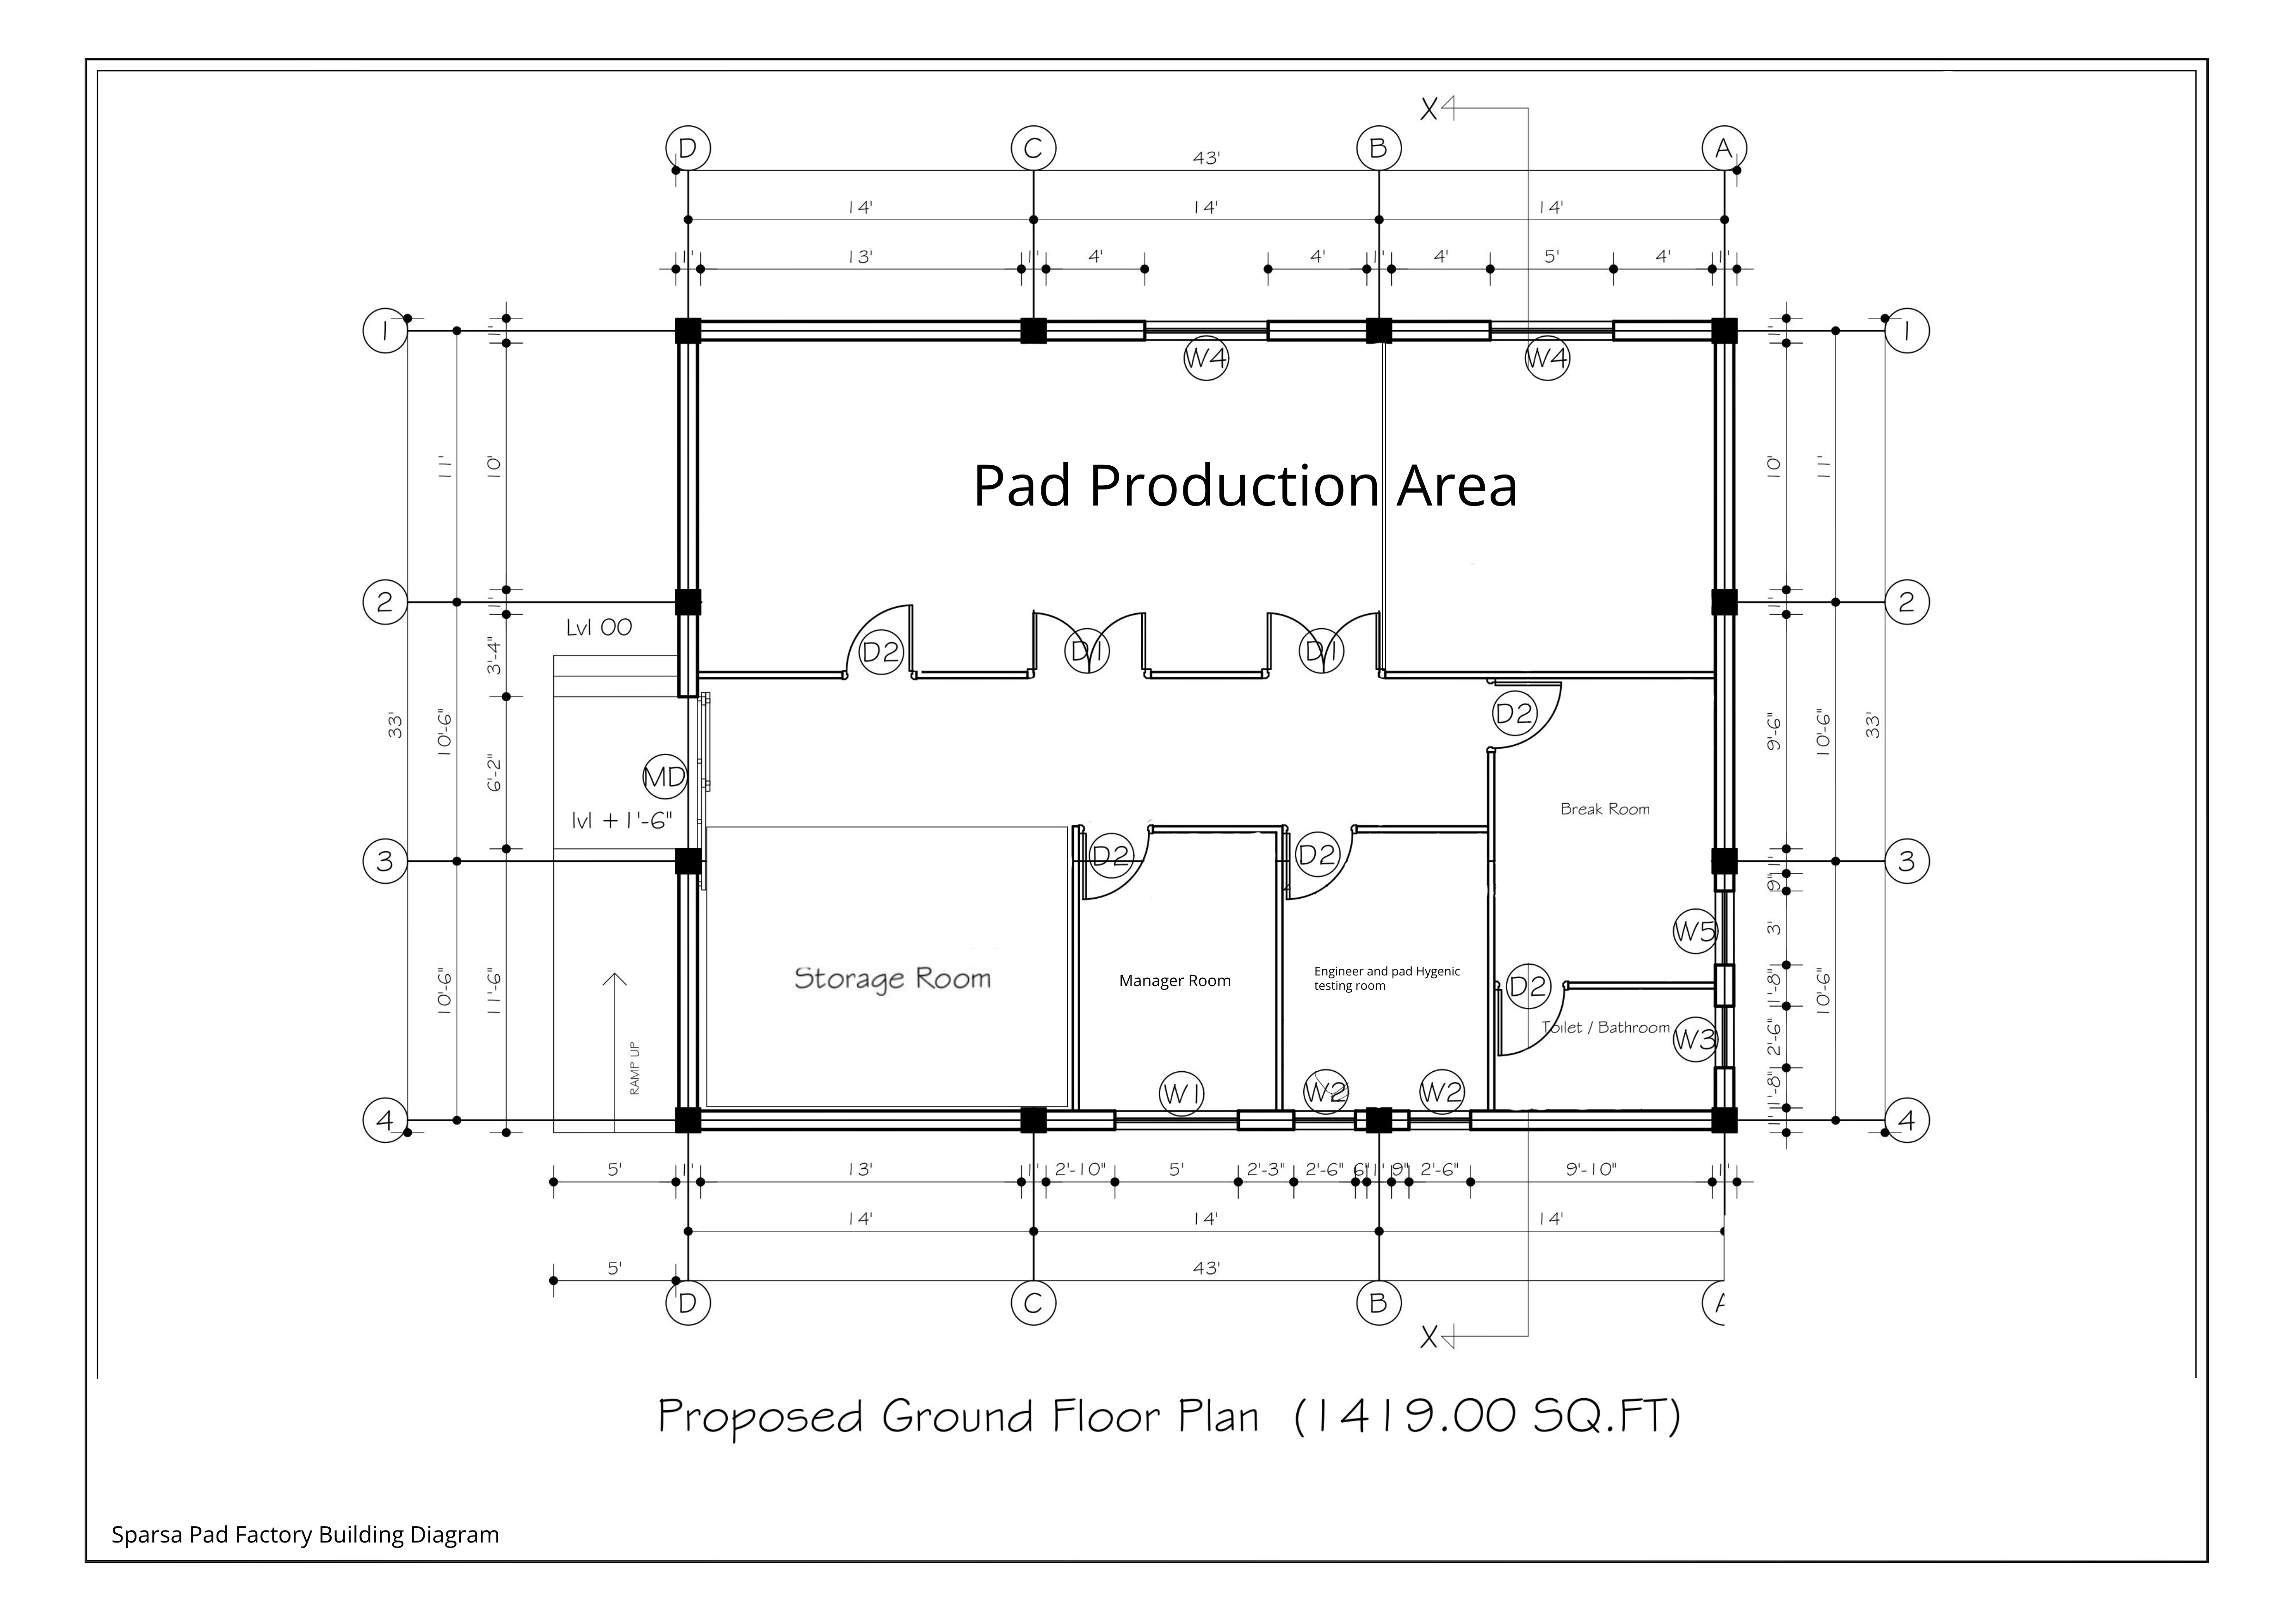
You can find further technical details and diagrams of the different tanks in the attached documents.


Several tests have been made to verify the efficiency of our system. The well water was not safe to drink, as E. coli was present, as well as a high quantity of heavy metal such as iron. Our system made the water safe to drink, according to the Nepali standard for safe drinking water, as well as the European Union standard.  

This system is fairly easy to reproduce and does not require high tech equipment. Depending on how the system is built, only one pump (the one from the well) is needed, then gravitation is enough. In addition, if there are no tanks available to purchase, it is possible to build the tanks with bricks and cement. Regarding the gravels, their sizes are not fixed, if the size range is slightly higher or lower, it will still work. For example, in our case, as we couldn’t find gravels which were already distributed by size, we did it ourselves with mesh of different sizes. 

The biochar can also easily be made directly on site. We made it ourselves with a Kon Tiki kiln, inspired from the work of the Ithaka institute: https://www.ithaka-institut.org/en/kon-tiki

Key Insights Related to the Water Treatment System

We identified two critical aspects of our water treatment setup that significantly affect performance and reliability:

  1. System Maintenance is Essential

Regular maintenance is crucial to ensure both water quality and consistent flow rates. Key maintenance tasks include:

  • Removing accumulated sediment from the gravel filter.
  • Cleaning the biofilm layer on the surface of the sand filter.
  • Replacing the biochar periodically, as its effectiveness diminishes over time.
  • Cleaning and disinfecting storage tanks periodically to prevent contamination.

Neglecting these tasks can compromise the entire treatment process and reduce the availability of clean water for the factory.

  1. Pump and Automation Setup

Our factory is located on flat land, which required the installation of two pumps to ensure proper water flow throughout the system. Automating the process with float switches has proven especially helpful. It ensures a consistent water supply by automatically triggering the pumps based on water levels, minimizing the need for manual monitoring. A schematic of our float switch system is available in the documents section.


Wastewater Management: Current Challenges

We also built a wastewater treatment system, which is not yet functioning as intended and is currently under review for improvements.

  1. Current Setup:
  • Wastewater collection is done through floor channels that direct water from the factory into a treatment sequence.
  • The water first flows into a gravel filter tank, followed by a second tank with sand and gravel.
  • The final stage sends the treated water into a soak pit, allowing it to return to the soil.

We do not reuse this water in the factory. Instead, we opted to release it back into the ground, cleaned. Indeed, being located closed to a river, we have enough water supply, and we were concerned about bacterial buildup in a closed-loop system. 

  1. The issue

The soak pit currently does not absorb water quickly enough, leading to frequent overflows. We are actively seeking a more effective solution and will update this building block once a new system is in place.


Machinery Overview: 3D Models, Operation, and Safety Protocols

In this building block, we focus on the machines and equipment used in our process. To support knowledge sharing, each piece of equipment is accompanied by a PDF document that includes:

  • 3D models (when the equipment has been designed in-house)
  • Safety protocols
  • Working principles

The Hollander beater is an exception, as it was purchased rather than built by us. For this machine, the PDF provides guidance to help you either make an informed purchase or, if you're able, use our notes as inspiration to build your own.

The PDFs are numbered according to the sequence in which the equipment is used in the papermaking process.

Please note: in 2025, we will be redesigning and optimizing most of our factory equipment. Until these updates are complete, the PDFs will feature photos instead of 3D models. Once the new designs are finalized and the updated equipment is built, the documents will be revised accordingly.

If you need further information in the meantime, feel free to contact us.


All the equipment we build is low-tech, to enable replication anywhere. However, to do so, it requires having access to certain machines (arc welding, grinder, cutter, etc) and certain materials (steel, stainless steel, welding rode, blades, motor, etc), or to be able to order them from professionals’ workshops (as we did). 

For the beater, we ordered it from a company located in India, in case you are interested, we can share with you the company’s detail. 

If you are working with a local workshop to build your machine, here few points to keep in mind:

  • it's a good idea to test the machine using the actual material it will process—while it's still at the workshop. This helps ensure everything functions correctly.
  • It’s also essential to agree in advance on key technical details, such as the type of material (e.g. stainless steel or mild steel), sheet thickness, motor power, and motor quality
  • In our case, it was also important to stay in regular contact with the workshop or visit it frequently to monitor progress and ensure the work was on track.

In addition, here are some lessons we learned regarding the machines themselves:

  • Boiler system: The initial version used a gas stove to heat the boiler, but we have since switched to an electric boiler. The gas system was highly inefficient in terms of energy use and posed a fire hazard.
  • Lifting system: Even with low production volumes, it's important to invest in a safe and efficient lifting system. This not only reduces risks for operators but also makes their work significantly easier.
  • Mould and deckle size: The dimensions of the mould and deckle directly affect the size of the paper sheets produced. If you aim to trim the edges cleanly and produce standard paper sizes (such as A1, A2, A3, etc.), it's essential to design a mould and deckle that can accommodate those sizes.
Detailed Process Flow and Factory Layout

Overview of the Paper-Making Process and Factory Layout

This building block focuses on the paper-making process—from raw banana fibres to finished paper—and the factory layout. For detailed information about the machines and equipment used, please refer to the next building block.

Our process is a simplified, manual version of traditional paper-making, specifically designed to avoid the use of chemical products. For example, during the cooking stage, we use only clean water without additives. This thermo-mechanical treatment reduces environmental impact, simplifies wastewater treatment, and improves logistics. Given that our factory is located in rural Nepal, access to external materials can be challenging. Most of our equipment is designed and built locally to ensure easier maintenance.


Step-by-Step Process:

  1. Cutting Banana Fibres: After extraction, banana fibres are as long as the trunks. We cut them into pieces 1–2 cm in length using a commercial chaff cutter.
  2. Boiling the Fibres: The cut fibres are placed in a drainer, which is then set in a boiler. Clean water is added, and once boiling begins, the fibres are cooked for 15 minutes. This step serves to clean the fibres.
  3. Rinsing: After boiling, the drainer is removed, and the fibres are rinsed in clean water.
  4. Refining: The fibres are gradually added to a Hollander beater, along with clean water. This key machine cuts, separates, and fibrillates the fibres, increasing their absorbency and preparing them for sheet formation.
  5. Sheet Making: The resulting pulp is mixed with water in a vat. Operators use a mould and deckle to manually form individual sheets of paper.
  6. Pressing and Drying: The wet sheets are stacked and pressed using a screw press to remove excess water. Once sufficiently dry, they are hung in a solar dryer (or greenhouse) to finish drying.

A PDF document titled “Process” is included with this building block, summarizing these steps with photos.


Factory Layout

You can find the factory layout in a separate PDF attached to this building block. It’s worth noting that fibre extraction also takes place in the same facility. For more details on that process, please refer to the building block dedicated to extraction.

Currently, we produce about 2 kg of paper per day, with plans to scale up to 20 kg per day within the next year. This increase will come from optimizing equipment and expanding our team of operators.

Although this process was specifically designed for banana fibre, it can be adapted for use with other cellulosic fibres. However, the boiling step may vary depending on the type of fibre.

Banana fibres are relatively easy to extract directly from the trunk, requiring only a light boiling treatment. In contrast, fibres like wood or bamboo generally require a more intensive cooking process to break them down effectively.

Designing and setting up a factory, even a relatively simple one, involves many details that may not be immediately obvious. Here are some key takeaways from our experience:

  • Seek Professional Support:
    If you're designing your factory yourself, consult professionals such as architects. While the structure may seem simple, small but critical elements can be easily overlooked, such as:
    • Adequate number and placement of windows for natural lighting
    • Sufficient roof exhaust fans to manage indoor temperature
  • Plan for Water Management:
    Papermaking is a water-intensive process. It's essential to include proper floor drainage systems (e.g., channel drains) to facilitate efficient wastewater evacuation.
  • Design the Electrical System Around Your Equipment:
    Ensure that the factory's electrical system is aligned with the needs of the machines. Finalize your equipment layout before construction to guarantee that every machine has access to the necessary power supply.
  • Adapt Equipment to Operators:
    If your equipment is self-made, customize it to the physical needs of the operators. For instance:
    • Adjust the height of the vat to match operator comfort
    • Size the mould and deckle appropriately to ensure ease of use